Cutting an Eb Tuba
It's Christmas, 1999, and my fiance's uncle wants a tuba. He'd played in school, which was quite a while back, and his buddies were pestering him to pick it up again so he could join the local polka band. When he found out I played, he asked me to look around to see what was available, and he set a strict budget. So, I called around to all the standard places. An old Eb would have fit the bill (as in, playable but cheap enough), but he wanted a BBb. I finally found a horn for him on ebay, after unsuccessfully bidding on several. It was a Besson, quite old, with an unconventional three-valve compensation system. The condition was quite good for a 75-year-old instrument, but it had a collection of problems that needed looking into. In a couple of days, I cut the tuning slides, replaced a cracked receiver, repaired a couple of loose braces, and polished about a pound of tarnish off the old silver-plated finish. The resulting horn played acceptably, and looked right nice. (Uncle has moved on to much better instruments, by the way.)
But I only had two days to play with it. Not enough, and I was still itching. I had The Bug.
About that time, I happened upon Carl Kleinsteuber's web page describing how he turned a CC valveset and an Eb's outer branches into a large F tuba. The itch grew stronger.
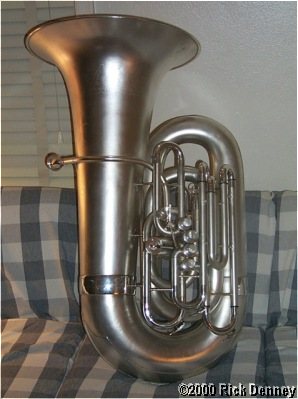
Then I saw an ad on ebay for a stunning Holton CC (shown below) that had been converted from a BBb by the incomparable Joe Sellmansberger of Mid-South Music. I was inspired. And the itch was killing me.
One thing I had noticed in my ebay exploration: Eb tubas go for about half the price of BBb horns, which go for about half the price of CC tubas, all else as equal as it gets. So I looked for a horn that had a sufficiently high intrinsic value, but really looked rough, and so would be cheap enough for my experiment. I want the privelege to fail, which means I needed an instrument whose nickname could be "Solder Practice."
I found the perfect horn: An ancient Missenharter stencil horn. The history of the instrument is unclear. The label provides a variety of optional interpretations. The best guess at present is that the horn was made in Graslitz in the late 19th century, and imported into the U.S. and sold as an American instrument. This sounds like cheating, but actually, the so-called Graslitz stencil horns were not bad instruments.
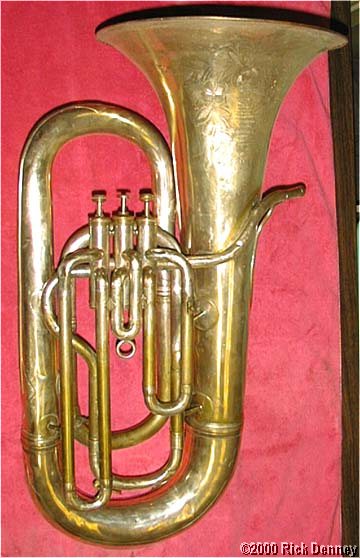
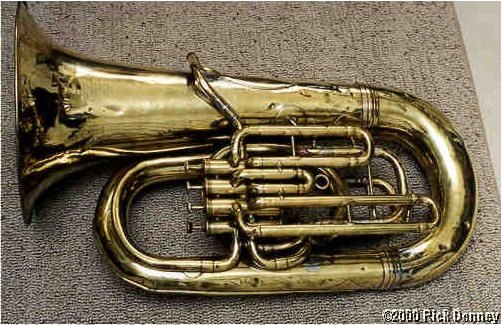
Here's a picture, as it was advertised on ebay:
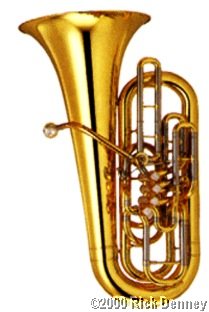
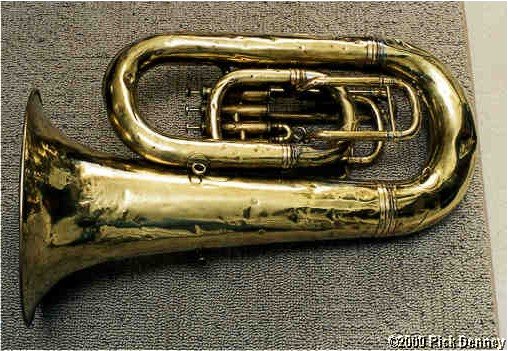
The picture shows a nice-sized 4/4 Eb, with a 15-inch bell and relatively large (for an old Eb) outer branches. It's a little bigger than my Yamaha F (compare the outer branches), shown below:
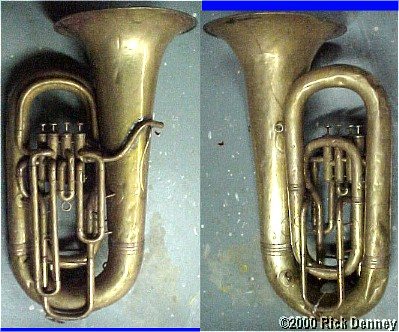
This particular Missenharter was a lot more interesting than other instruments of the breed. Here's a more typical example (approximately to the same scale as above):
Unlike most cheap Eb horns I've seen, the leadpipe of the Missenharter feeds directly into the first valve, instead of looping through a tuning slide first. This is a Good Thing, because it places the valves as early as possible in the open bugle. Tubas are conical--the diameter of the tubing steadily grows from the mouthpiece to the bell. This taper is interrupted by a long, straight section through the valves. The closer to the mouthpiece that takes place, the better, or so goes the theory.
Another nice feature was the rather open wrap of the fourth valve tubing, which minimized the tight turns that make a horn sound stuffy when those long valves are used. Well, sheesh, it had a fourth valve, which all by itself separated it from most cheap Eb tubas.
The final attractive feature was a looong tuning slide, providing a generous length of straight tubing to remove.
And, yes, the objective was to remove tubing. I wanted to turn this Eb into an F. Why? Why not? Hey, I already know how to play an F tuba.
To turn an Eb into an F, one must remove 18 inches of tubing from the main bugle. This is the length of the first valve tubing on an F tuba (which turns an F into an Eb).
The ebay transaction is completed, and the Missenharter arrives. The first check is the bore, unknown before this time. The bore is about 0.65 inches, which is big enough, considering the short leadpipe.
The horn itself shows an early vintage. The detailing is professional, but with the kind of imperfections that bespeak a lot of old-fashioned hand-work. It also shows quite a history of professional and not-so-professional repairs.
And it was a mess. The first task would be to make it a playable Eb tuba.
The instrument played, but badly out of tune. I thought the valves were leaking, and they do a little, but not as much as I first thought. The tuning slides were stiff, to say the least, and required considerable tugging to pull them out. The first thing I did was to fire up the torch and loosen the solder joints on the tuning slides, both inner and outer, to let them relax into each other a little bit. This helped. Later, I worked on them some more.
The valves were another story. If you'll look at the picture above, you'll see that the button on the second valve seems a bit different from the others, and stands a bit taller. Actually, this button belonged on the fourth valve, which is made a bit differently than the other three, indicating that it was added in a separate production step. By carefully measuring down from the top of the casing with calipers, I determined the proper position of the piston both at rest and when pressed. I was able to mix and match the cork and felt washers on the horn such that the valves were aligned within a hundredth of an inch. That's a lot better than it was. Upon arrival, the first valve was a full eighth of an inch too low at rest, and the other valves were just as bad. That makes a horn with a 0.650" bore play like a horn with a 0.525" bore right off the bat, not to mention the turbulance created by all those edges. Valves are turbulent enough as it is.
The first valve alignment guide was also badly worn. Guides on newer horns are usually set into a slot in the piston and held in place by a screw, or, for even newer horns, shaped as a plate and screwed to the top of the valve piston. On this horn, they were soldered in place. I filed the old one off, and soldered a small tab of brass in its place. A little work with a file fit the new guide to the guide slot in the casing.
There were several leaks in the horn, and to find them, I plugged the bell with a high-tech tool consisting of a roll of paper towels wrapped in plastic. With the plug stuffed into the bell, blowing into the mouthpiece forced air out all the leaks. The leaks could then be found by tracing the resulting breeze. The joint between the bottom bow and the right side branch was leaking severely (I felt that breeze on my right leg!), as was a poorly made repair on a crack in the third-valve tubing. The leadpipe also leaked but it had an assortment of other problems. One of the fourth-valve tuning outer slides was leaking, too. I repaired these leaks by resoldering the connections, and by patching the cracks (instead of just covering them with solder as had been previously done). When I could remove my plug through air pressure alone, I knew the horn was reasonably tight.
And what a difference all this made. I know that the valves had never been aligned, because the bottom caps had to be unscrewed two turns to keep the properly aligned pistons from striking them when pressed. Wear patterns on the valves showed the misalignment. This horn was playing as its designer intended probably for the first time in its history. Well, except for all the dents.
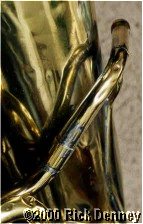
The leadpipe was a special problem. It was attached to the bell with about a pound of solder, that had been piled on and coarsely filed down along the sides of the pipe. The suspicion was that the solder was covering corrosion perforations. I decided to removed the leadpipe, fix the problems that appeared, and reattach it a little more neatly. I melted the solder off the bell and leadpipe, and removed the receiver brace. The solder had been covering the open seam of the leadpipe, which had apparently corroded through. I cut a long, thin patch, and soldered it over the seam. I also soldered a sleeve around the leadpipe to repair a crack that was working its way around the pipe. And the end of the pipe, where it is attached to the first valve, was corroded. I cut off about a half inch, filed it down slightly, and soldered it back in place. Soldering one part without melting the solder on the other repairs requires a careful touch, and just enough flame to melt the solder where one is working. It took me several tries to get it done without leaks, and though the results are not pretty by any means, it's far better than it was. I relocated the receiver support so that the leadpipe would stand away from the bell about a quarter inch. This horn may be a Frankenstein, but it has a detached leadpipe! Here's a picture of the new leadpipe:
Now for the cutting. To remove 18 inches, I first removed the straight sections of the tuning slide, and soldered the curved portion directly to the couplings with the inner slides. I then cut off all but about an inch and a half of the inner slides, and the same amount from the outer slides. The cutting was done with a rotary tool (i.e. Dremel tool) and a fiberglass-reinforced cutoff wheel. All totaled, I had removed five inches from each side of the main tuning slide, or ten inches total.
The other eight inches came from the third bow of this five-bow (including the tuning slide) horn. I removed the bow and cut off four inches of the straight tubing, which was just about all the straight tubing available. Becuase of the conical shape, I had to reshape the taper for the joints to match. The bow diameter lost (or gained, depending on which side) about an eighth inch in that four inches, and therefore required a change in circumference of about 3/8 inches. I cut lengthwise along the bow on the side that was too small--one long cut on the outside of the bow, and three shorter cuts on the sides and inside. The long cut was about two inches. I spread the bow out, mostly at the long cut, but a little at the shorter one, too, to facilitate fitting it back into the coupling.
On the side of the bow that was too large, I remove a wedge about two inches long and 3/8 inches wide at the joint. I squeezed the joint together, and tapped the resulting small point with a hammer to work it back into the curve. I then made patches for all these cuts from the sections of tubing removed, and wired them in place. Again, the soldering is not pretty, but it gets the job done. I fetched my bell plug, and again performed a leak test to make sure my solder joints had no gaps.
The moment of truth comes when a cut horn is solid enough to place a mouthpiece and play to a tuner. It's an F!
The final step is shortening all the tuning slides. Each slide needs to be shortened about 10%, but I shortened them a bit more to allow for more tuning range. I also shortened the inner slides considerably--the less tubing that is inserted, the less likely it is to get stuck because of ripples and small dents in the tubing. The fourth-valve slide got the same treatment as the main tuning slide. The second valve proved to be short enough as is, which saved what is usually quite a difficult cut without removing the tubes.
To remove the oxidation, and especially the corrosive soldering flux, I minimally buffed the horn and gave it a good bath. Here's the resulting before and after:
The result? The horn plays sort-of in tune, with a easy-speaking upper register and a solid, contrabass-like bottom. Did I say sort-of in tune? Maybe that's an overstatement. Intonation is wacky, especially down low, but it's reasonably steerable. It doesn't sound as present as the Yamaha, but it has a mellowness, even a sweetness, that the brightness of the Yamaha doesn't convey. And the valves are lightning fast. Boy, do I wish I'd had this horn when I was in the Heritage Brass playing Civil War re-enactments, and needed something genuinely old (and old-looking) that was at least approximately playable.
Since making the above photo, I've worked on those dents, mostly transforming them into ripples. Smooth brass? Ain't happening on this one.